Quantcast
Channel: four square walls
Viewing all 105 articles
Browse latest View live

o' henley

$
0
0

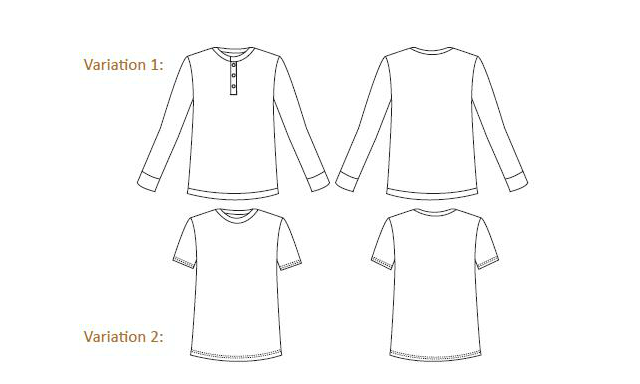
OK, more dudewear! I know you gals love it, right? Here are some handmade Henleys for the handsome him in my life. Apparently Henley (a collarless shirt with a short buttoned placket) is a capitalized word because it's named after the English town of Henley-on-Thames. Ralph Lauren was the one who said, "Let's take this weird long underwear top historically worn by rowers and make it popular for all men to wear in public" (not a direct quote) and it worked, because he's Ralph Lauren. Alright, enough history.


The pattern is the Strathcona Henley from Thread Theory, the new menswear pattern line based in Canada. You can see the shorts I made from their great Jedediah Pants pattern here. I bought the Strathcona PDF the second the pattern was released. Corey had been wearing these awful pilling Henley shirts from H&M that stretched out like crazy in the arms and were made from the blood and tears of children working in sweatshops overseas (I perhaps exaggerate). Our household has recently enacted an unofficial and unvoiced ban against H&M. I prefer to be the underpaid seamstress for all of our clothes, got it?


Corey is 6'1" and has a 30" chest. I made him the size XS with 1/2" seam allowances instead of 5/8", and it has a slim fit to his liking.


I don't really want to sugarcoat my whole review of this pattern, because I came across some issues with the construction and design that I changed in future versions for better results. HOWEVER, it's an excellent starting-off point and the fit is great, so I'm delighted with it anyway. My first try/muslin was a hot mess. The second one (the red one in the first photo) was better, but the fabric is a weird cotton/lycra blend from Girl Charlee that changes colors when ironed and gets fingerprint markings when handled. The third one is this heather gray version that is cozier fabric and is better made (but not stellar) in general.


So, in case you're interested in making this pattern, I want to go over some stuff that concerned me or that I changed. This post is pretty detailed about a men's pattern that a lot of you won't make, so I understand if it's not your thang.

1) Placket
The placket as written is supposed to turn out like this:


The placket is cut as one piece that is intricately folded so the inside ends up with tucked away raw edges. The bottom edge is folded and topstitched on the exterior of the garment. Red flag: disastrous sewing for Andrea ahead. Plackets are naughty by nature. Combine that with stretch fabric and an impatient seamstress and good luck.

After Googling the hell out of some plackets for Henleys and polos, I realized the ideal (for me) method was already under my nose: the Banksia Top pattern by Megan Nielsen! She includes two methods for the Banksia placket in the pattern instructions and on her sew-along. She calls this one the "easy" method, and I agree that it is easier, but I also prefer the way it looks because the bottom edge is tucked out of sight to the inside of the garment. 


To make the changes to the Strathcona pattern so I could follow Meg's example, I sewed the 1"-wide rectangle on the shirt first, so that when slit down the middle it creates two 1/2" seam allowances. Then I cut two separate placket pieces instead of one. I wanted a one-inch wide final placket, so each piece is 3 inches wide to start. It's interfaced, folded in half wrong sides together, and sewn at 1/2" to the front placket slits. I followed the rest of Megan's tutorial and called it a day. Just note that the Banksia has you finish the neckline before attaching the placket, but in this case for the Henley, the placket should be sewn before the neckband is attached. And of course, for menswear, the placket opens the opposite way (which it does in the Strathcona instructions but not in the photos that accompany the pattern).


I made my own my calculation error on this placket (sewing it at 5/8" seam allowance instead of 1/2"), which is why the left side looks a little too narrow and doesn't lay completely flat when worn. What I wrote out in the above paragraph will address this, though.

2) Neckband
The pattern piece and cutting layout tells you to cut the neckband along the lengthwise grain. Huh? On two-way stretch fabrics (jersey, double knit, interlock, ponte), the maximum stretch is on the cross-grain of the fabric. So... in this case, the neckband is NOT cut along the maximum stretch of the fabric, which doesn't make sense because the neckband absolutely needs to stretch to get over Corey's big fat head. It should be cut in the same direction of stretch as the body of the shirt is.


??

I tried it this way on the first Henley, and it was more difficult to stretch the neckband around the neckline of the shirt. The neckband is cut significantly smaller than the neckline -- which is appropriate for knit garments -- but without proper stretch in the neckband, it just doesn't really work. So, for future versions I cut mine along the cross-grain of the fabric instead.

If the neckband is cut on the lengthwise grain as instructed, then the neckband edges/corners are created by sewing vertically (along the crosswise grain), which means they groooowww as you sew, and you get ugly pointy neckband corners that are not squared off. This is hard to explain in written text, so I'm sorry if you have no idea what I'm trying to say. Let me know if you want more photos, because I plan to make this shirt again soon and can take construction shots.

3) Buttonholes
The pattern doesn't call for a button on the neckband, but it seemed too thick to not have one. I added one so it doesn't flop open and flash its serged seams. Risque.


My machine dislikes sewing buttonholes in general, but especially on this shirt, it was a nightmare trying to get the buttonhole foot to move at all on the finished placket/neckband. On my third version, I opted to sew the buttonholes on the placket and the neckband before attaching them each to the shirt. This made for neater buttonholes, yes, but it also meant I didn't get the final spacing very even. I didn't say anything about the button spacing to Corey and he didn't notice (or care), so we'll pretend it was intentional.

4) Cuffs and Hem Band
The sleeves on this shirt are meant to be long on a normal dude (versus long-armed Corey). The cuffs themselves are quite long. He requested that I lengthen the sleeve and shorten the cuff part a bit.


I omitted the hem band because the shirt would have been too long (in his opinion) with it, and I wasn't digging the style. I finished the hem with my coverstitch machine instead.


Besides the minor issues I had, it all sews up quickly and comfily. Snuggle up.


I hope I don't seem too nitpicky, because it truly is a great casual wardrobe staple for guys. Corey loves both of his. And Thread Theory includes very thorough instructions for sewing with knits - with or without a serger - that are geared toward beginners. If you're confident in your placket-making skillz, then this shirt can be made in a hot little minute. Or you can just make the t-shirt version!

If you've sewn a placket like this, do you have a preferred method?


concerto

$
0
0

I'm on a downward spiral into the dark abyss of craft addiction. Soon I'm going to wake up, gasping for air amongst a pile of mod-podged bird houses and baby flower headbands with an overdrawn bank account and no memory of the preceding week.

It all started by sewing practical household stuff like pillows and curtains. Then I launched into making my own clothes (as you know), which has been fulfilling and challenging, so I was content with investing my time in that alone for a couple years. But then I got it in my brain recently that I should try making a quilt, just because. Then I decided I wanted to knit more stuff, too, so I signed up for knitting classes and am currently knitting my first hat with grand visions of cabled sweaters in my future. What I'm saying is that I WANT ALL THE HOBBIES. 


So here I present the quilty step of my creation obsession. I partially blame fellow blogger Ashley, who made some cool and simple chevron quilts recently (here and here) and sent me a link to Crafty Blossom's blog. Then Tasia of Sewaholic fame wrote an epic post about her first quilt, and she made it seem doable and fun. Then I started getting Pinteresty with quilt inspiration. Once that happens, you really can't stop me. I purchased a quilt pattern that night and planned my trip to JoAnn for the next day.


I wanted a simple quilt with geometric shapes and solid colors, so I was immediately drawn to the Concerto pattern by Aria Lane, pictured above on the left. The asymmetry is modern and interesting and you can combine bright or neutral colors. For the fabric I went with the recommended Kona cotton solids by Robert Kaufman. I didn't want to risk buying cheaper fabric in case it were terribly off-grain or too loosely-woven to make a nice quilt. It felt strange to be on the other side of the fabric store than usual. The double knits and flannel shirtings were whispering harsh words about me behind my back. It took all the self control I had to resist shutting them up by buying them all.

The pattern suggested a couple different color schemes, and this one happened to match our living room decor (and my blog) pretty well so it seemed meant to be. In the Kona colors, I chose White, Navy, Curry and Ash to make the throw-size version (64" x 78"). The pattern gives you instructions for making a wall, crib, throw, twin, queen or king size quilt. I'm having heart palpitations just thinking of the time, space and insanity needed to make a king size quilt.


Making a quilt -- or this type of quilt -- didn't require learning a whole host of new construction techniques for me as an apparel sewer. Since I already own a rotary cutter and walking foot, the only new "tools" I invested in were some rulers to help the cutting process: a 6" x 6" clear one and a long 2.5"-wide one for the binding. This pattern is just a bunch of squares and half-squares (i.e. isosceles triangles) and I chose to do straight line quilting, so I didn't encounter anything technically difficult. I still was expecting the pattern to include some tips about quilting techniques in general, but it didn't really. It tells you what to cut and when to do things, but it doesn't specifically tell you how. I consulted blogs for more info about how to baste and bind a quilt.

What was newest for me was how every step of the creation process takes SO.LONG. When you cut, you cut forever. When you stitch the squares and then stitch the rows, you stitch forever. When you sew the binding to the edges, you press and turn and stitch forever. With apparel sewing, the longest you're at your machine for one sit-down is, what, 10 minutes?, before you need to press something or pin another seam or unpick your horrible buttonholes. With quilting, you can be at your machine for one sit-down for DECADES. And your back muscles groan at the struggle, and your bones begin to creak and your hunchback sprouts. It doesn't help that I decided to baste, quilt and bind the whole thing in one Saturday. On Sunday I learned that it's possible to wake up sore from sewing.


I also had to adjust to the awkwardness of shoving a huge beast of triple-layered fabric through my sewing machine. When you're in the middle of sewing a rectangle that is taller than you are, and have no edges to hold onto, sewing even stitches becomes difficult. I started out using my edge-stitching foot, but my stitches were so uneven and strained due to my inability to hold and guide the fabric properly, and my machine's feed dogs struggled to pick up the slack. I switched to my walking foot and found a way to roll the sides of the quilt into burritos so I could grip them to steer (like you see in Step 5 here, but without the clips). This helped with the quilting, and then from there I just had to emotionally adjust to the boredom of sewing rows of stitches for what felt like the rest of my life. I can't imagine if I actually followed the pattern's suggestion for quilting with a "very dense organic crosshatch." While it looks pretty cool, I'm not sure I nor my machine could handle it. I also did not want to have to burn through 5 spools of thread and 18 bobbins or whatever in order to make it work. Yea, making a quilt takes a LOT of thread.


I unfortunately don't have a bottomless wallet, so I cheated for the quilt backing. I bought a $4.99 twin-size gray sheet from a big box store, which is ironic considering I wanted a higher quality Kona cotton quilt top. Eep. The binding, too, is dark navy twill leftover from some unblogged Jedediah shorts I made Corey this summer. It doesn't perfectly match the navy squares in the quilt itself, but I was really avoiding having to buy any more yardage.


Despite my complaining, finishing my first quilt feels like a grand victory. I've already forgotten the tedium of it and want to start a new one all over again. This one has been well-loved and heavily used in the past week, so I'm glad I made it. It's the perfect size for one or two to snuggle. And I know I look sickeningly smug when I plop on the couch wearing a handmade outfit, wrapped in a handmade quilt, knitting a handmade hat. CRAFTY HIGHS. 


Do you ever cross over between sewing apparel and quilts? What do you like about one versus the other? And how many hobbies are too many?!

fear fabric: a lacy affair

$
0
0
Since it's Halloween and all, let's talk about our deepest fears. I have a few weird fears: Furbies most of all -- those awful talking, blinking, "sleeping" toys with the beaks and moving ears. Talking dolls or toys in general, especially broken ones that start chanting at you in the middle of the night (yes, that's happened to me). Ferris wheels, which I guess goes in line with my general fear of heights. Mean clowns, sure. Mean clowns hiding in the shower. Ghosts. Mean clown ghosts hiding in the shower. Lace.


Wait. Lace? Okay, we've moved into a different category of fear. As in, the fear of challenging your skill set, venturing into the unknown, and potentially failing at a sewing project due to lack of experience. THAT is actually what this blog post is about. Sorry we have to move away from the clown ghosts.

In the spirit of the spooky holiday, Beth of 110 Creations challenged a few of us bloggers to tackle one type of fabric we've been "afraid" to sew with. Enter the Fear Fabric Challenge. Because of my scaredy cat nature, I'm too nervous to sew with a lot of types of fabric, like silk chiffon, leather, suede, sequins. Lace has always been on that list, too. How do you sew through holes? How do you finish the edges? How to you hem it? How do you wash and care for it? Will it end up looking like a costume for a zombie bride?


Guys! Guess what! It's not hard. The hardest part about sewing with lace is finding acceptable lace to sew with in the first place. It can get very bridal or very tacky trashy very fast. The local options were both the latter and the former, and I found it difficult to shop online looking at 2D photos of textured fabric. Not to mention that almost all laces are floral patterns, and I feel a little uncomfortable wearing something so incredibly feminine. I'm not the neighborhood tomboy but I'm no Grace Kelly either.

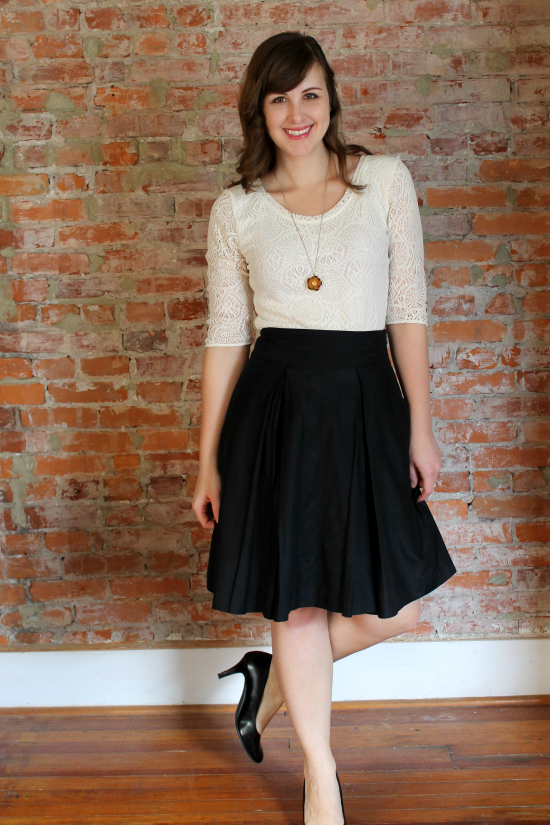
I decided to look specifically for crocheted lace in an off-white color, because it has a bit of an earthy feel to it -- instead of pure bridal delicacy. I actually found this crocheted lace on Fabric.com. It's a stretch lace (find it here), which I dug because that meant I wouldn't have to sew darts or do much fitting with this "scary" new-to-me fabric. I love the pattern of this lace -- almost like seashells.


I underlined the front and back with hatchi jersey knit in ivory, also from Fabric.com. I treated these layers as one when attaching the neckband and sleeves as usual. This made it easier to sew because the jersey helped fill in the holes of the lace.


The pattern is the Kitchsy Coo Lady Skater Dress, with the bodice lengthened to a tuckable top length. Obviously I left off the skirt. I considered making a full dress in this fabric but wanted to avoid the taboos of wearing all white after Labor Day, or wearing a white lace dress when I wasn't on the altar. I was also afraid if I made this fabric into a full outfit, it would be more likely to snag on things. I'm glad I made this choice because I can wear the top with neutral skirts to work, or wear it with fancier skirts for fancier shindigs, or wear it with shorter skirts for weekend fun times. I've already worn it three times since I made it this past Saturday, heh.


Sewing with stretch lace is very similar to sewing with any stretch fabric. I referenced this blog post by Sew Fearless about it just to make sure I was on the right track. Appropriate that her blog name is Sew Fearless for my Fear Fabric challenge, yea? Tips include using a stretch needle, zig zag stitch or serger, and Wonder Tape to help stabilize and fill in the fabric for hemming. Stabilize your shoulder seams, too, if you're proper (I am not). 


My fabric is polyester. !! I was in NYC for a hot minute a couple weeks ago and breezed by the lace section at Mood, where silk lace runs at ~$40/yard. Sorry Charlie, je suis pauvre. 

I feel like maybe I phoned it in on this challenge because I essentially just made a t-shirt. I don't think my lace-sewing skills will ever be on par with, say, Julia Bobbin's (see here, here, here, oh and here for evidence), but I don't think my sewing skills or my style in GENERAL will ever be on par with her's. And I'm okay with that! I love my little poly top that cost me like $13 and 2 hours, and I still feel accomplished for finally sewing with a new fabric. You go girl.


P.S. My skirt is not handmade. It's from Banana Republic - bought secondhand last year before the anti-shopping habit kicked in.

Be sure to check out how these other sassy gals tackled their fears. Participants in the Fear Fabric challenge include:


Who else is scared of sewing lace? Or, who else is scared of Furbies? C'mon, I need to know I'm not alone on that one.

holiday party dress

$
0
0
Wow, I have seriously neglected my blog lately. I last updated on Halloween and now it's nearly Thanksgiving. I bet you guys have been able to get by just fine without me. I miss you, though, friends of the webz. Work stress has been taken out on my knitting needles, where I'm still fumbling along like a noob and can barely complete anything.

Despite my poor blogging etiquette, I was lucky enough to be asked by Suzannah of Adventures in Dressmaking to take part in her 7 Days of Holiday Party Dresses series. Seven different bloggers and seven different holiday dresses have been featured over the past two weeks. Today you'll find me over there, wearing a new dress. That I sewed! Yes, I still sew.


Head over there now to read about this dress and all my usual blabber. Have any of you planned to sew a holiday party dress this year?

archer appreciation pt. 5

$
0
0
I made this Archer before I even knew December was Archer Appreciation Month. Yeah, I've been that behind on blog reading and that sugar-high on pumpkin pie lately. But since I pull out this pattern every month or two when I realize I have hardly anything else to wear on Casual Friday, the chances were good that I would accidentally stumble my way into this bloggy sew-along led by power duo Rochelle and Erin.


This is my fifth time making the Archer shirt by Grainline Studio. If you know me in real life, you've most certainly seen me wear this stripey version. A lot. It's my favorite so far, because the fabric is made from rayon, which I lurv. I think this pattern is well-suited for crisp shirting fabrics like cotton (see Amy's), linen (see Lori's) and flannel (see Lauren's), but also works in more fluid fabrics like rayon, chiffon or silk (see Jen's, Lizzy's, or Stevie's). It means my collar stand doesn't actually stand up and the collar won't roll to save its life, but the general style of this pattern is pretty relaxed anyway so I'm fine with the pancake collar.


Sewing a button-down shirt with vertical stripes makes it laughably easy to neatly cut and sew those button plackets and line up buttonholes. Okay, maybe not laughably easy. The only time I "laugh" when making buttonholes is in maniacal rage after ripping them out for the thousandth time. But as I recall, I had no such issue with this shirt. 


I changed nothing about the pattern except lengthening it to cover my bum and omitting the cuffs because I always wear my sleeves rolled up. Always! From the looks of it, I should have added another button on the bottom, but, uh, I've gained some weight recently (see: pumpkin pie) so I don't think the shirt would close at my hips anyway. Ouch, that hurts to admit. 

I haven't really seen too many striped Archers around, so I'm glad I'm contributing unique content to the world even though I feel like I'm constantly blogging about this pattern. I love playing with stripes but didn't want to make it too dizzying in this case, so I only added one feature with horizontal stripes. I guess it's effective because people are always like, "I like your pocket" and I'm like, "Aw shucks."


There's not much left to say that hasn't already been said about this pattern. If you still haven't made an Archer shirt for yourself, December is the time to do it... when you're not too busy sitting in traffic in the mall parking lot or whatever. ~ 'TiS tHe SeAsOn ~ 

Jen, Grainline Studio's fearless head honcho, did a full sew-along for this shirt awhile ago, so check out those posts (in reverse order) here. And if you want to get neater results on your collar stand, check out my own tutorial about that here. I've loved hearing success stories from those who tried it out! 


Read more about #archerappreciation here or here.

In knitting news, I've finished a hat (that I've already lost, dear god), cowl and sweater since I took my beginner knitting class. If you live in Philadelphia and are interested in learning the basics and more, I'd definitely recommend the beginner knitting class at Rosie's Yarn Cellar in center city. It's a six week class and we learned how to cast on, knit, purl, increase, decrease, knit in the round, use double-pointed needles, cable, read patterns and charts, bind off, and -- most importantly -- fix most of our mistakes. We got to use the beautiful yarns in their shop to work on a ribbed hat and cabled fingerless mitts. I do feel like I can tackle a lot of patterns out there now.


The pattern above is Lara's Cowl in bulky Lion Brand Wool Ease yarn (from Joann's, not Rosie's, gah). Quick, easy and warm. I wear this cowl every.damn.day because the color complements my plum coat as well as my navy Minoru jacket.


Duh, this is the Owls Sweater by Kate Davies. I've finished it since I took this photo but I honestly don't really like it because of the high crew neck, bulky shoulders and the super fuzzy roving yarn I chose. And after blocking the sweater, the yarn now seriously smells like a sheep's ass. So, it makes me look like an adorable owl-clad linebacker who smells like I slept in a barn all night. Such a bummer.

How's your December making going?


ted d. bear

$
0
0

This year I almost didn't bother to make any gifts for Christmas. It's too stressful and time-consuming, right? But, if you think about it, handmade gifts are totally forgiving. Even if the receiver isn't smitten with the item itself, or it's something they would never think to get for themselves, they tend to be more likely to appreciate the gesture even moreso because it's handmade. For example, you can just buy an ole teddy bear anywhere, so it's not that interesting of a gift on its own. They sell teddy bears in airports, hotel gift shops, Amazon, in line at the CVS Pharmacy, Wal-Mart, Goodwill (#bedbugs), and even at the fabric/craft store. There is no shortage of teddies in any shape, size, or color. But a HANDMADE teddy bear? Oh c'mon now, that's special. ...Right?


I made this particular bear for my two-year-old niece for Christmas. I know a two-year-old doesn't care whether something is handmade or not, but her parents know and hopefully they'll tell her about it one day. I've mostly made clothes for her in the past (see the robe, dress/cardigan, and jacket), but making garments for an ever-growing child who is disinterested in clothes feels like too much of a risk (aka Waste O' Time). I decided this year that I should still make her something, but something that she can love for longer. I saw the bear that Lisa G made for her daughter recently, and decided to try that same How Joyful bear pattern and tutorial because they were free (here), and the finished product looked cute instead of creepy. It's 16 inches tall, sits up on its own, and is readily posed for a big hug. I followed Lisa's lead and made it a showcase for a cute fabric print.


The How Joyful Bear tutorial seems to be a popular post, but I could only find a handful of other people online who posted about their finished bears. The consensus seems to be that it's a difficult tutorial to follow. I agree that it's not explained very thoroughly, and it lacks photos of steps that could really use accompanying photos, like where the seams of the feet pieces should meet and how. However, the pattern pieces are labeled with letters on each corner so you know how they should line up with other pieces, which certainly helps because the bear's shape was not intuitive for me to figure out the construction order on my own. I wouldn't say it was difficult to make this bear, because it can be completed in one evening even with unpicking and some frustration about seams not matching up. It's just different than what I'm used to since it's a more complex curved 3-D shape than your typical knit dress.

I actually sewed this bear up once before this one, but the fabric I chose (some bathrobe-type material) shed like crazy, even after it had been sewn up, which made it very impractical for dragging around the house. Here's what I was dealing with:


Plus the first bear just turned out ugly. My second time around, I used better fabric, colors and accessories, and smoothed out some of the curves of the bear's head and belly so he wouldn't end up as grotesquely fat as my first one did. For this guy, I used light grey anti-pill fleece for the bear body and navy floral flannel for the contrast pieces. I didn't want to use a set of "animal eyes" because they kinda gross me out (don't ask), so I just sewed on black plastic buttons. I first tried fabric-covered shank buttons, but the fabric attracted lint and the buttons flopped around making the bear's face look insane. He's much more charming with these eyes, and I think I like that it gives off a hint that the bear is handmade instead of storebought. I cut the nose from felt and hand-stitched it on. The whole thing is stuffed with polyfill bought in a bag from JoAnn's.


I took a few photos of my niece opening the bear on Christmas morning. I think she said "Wow" and then kissed it (on our command), but since it's just a stuffed bear, it doesn't really provide endless opportunities for entertainment for a small child. I just hope she'll hang onto it for awhile and grow to love what Aunt Andrea made for her. Teddies are timeless! And this one has flowers on its face!


And yes, she and her daddy (in the background) were both wearing cowboy boots. Did you forget I'm from Kentucky?

I hope you all had a wonderful holiday. Did you, too, make something fleecey for a special niecey?

tartan

$
0
0

Happy new year, sweet friends. I have some ambitious plans up my sleeve for the coming year, and I've always been inexplicably more fond of even numbers than odd numbers, so I think 2014 should be a good'un. I didn't participate in all the bloggers'"top five"/reflection posts, but to seal up 2013, I thought I would share this plaid flannel shirt I made Corey in December. Last year was the year of the button-down, as I made five shirts and one shirt-dress for myself and four shirts for Corey. This one is definitely the most beloved.


The button placket IS straight!

I think we all know there aren't great men's shirt patterns out there, so I've built this pattern using trace-offs of RTW shirts (for the front, back, yoke, collar/stand) and the sleeve and cuffs from Burda 7045. The Burda pattern seems to be okay because it's actually a slim modern cut, but it didn't have the back pleat or curved hem that Corey likes, and the collar options are somehow confusing. 


I think I'm pretty close to achieving his "perfect" pattern, but the sleeves on this one puff out a bit too much above the cuff. I also still cheat and simply serge all the seams instead of flat-felling or whatever, but I think I should at least do French seams because he always rolls up his cuffs.

I was short on fabric so I had to cut the back yoke on the cross-grain, and the inner yoke out of a striped cotton sheet in my stash. The middle vertical stripe on the yoke therefore isn't the same width as the middle vertical stripe on the back, and the whole back print is kinda crooked (just now noticing, gah!) but O'WELL. The plaid matching on the front, sleeves and sides is pretty accurate so I'm happy.


The fabric is a cotton flannel shirting from JoAnn's. They do tend to have attractive tartan plaids there. Honestly I wanted to make something for myself with this fabric, but he practically pounced on it the moment he saw it on my sewing table, and he's just so damn charming. I ain't mad, though, because his wardrobe is only a fraction of the size of mine so he actually needed another shirt in the winter rotation.


Last week Corey flew back to Philly from Louisville during the winter weather chaos. His connecting flight was canceled and so they shuffled him around and got him on a late flight to a different PA airport. Not surprisingly, his baggage did not show up. They told him it'd be delivered the next day, but of course it wasn't. Days went by, and airline phone robots kept telling him that the bag had not yet been located. All I could think about was those beloved handmade shirts (four or five!), trapped in a cold, dark suitcase, abandoned in airport limbo. Losing his favorite handmade clothes all at once would mean losing a large part of his carefully curated (and limited) wardrobe, which is devastating enough. It would also mean that all MY laborious hours of love spent hunched over the cutting table and stepping on pins and slicing my hand with a rotary cutter would be a total, utter waste.

But the story ends happily because the suitcase finally arrived after a week. Has an airline ever lost any of your baggage full of handmade items?!

Anyway, that's the shirt. Does big-bearded Corey in a red plaid shirt remind you of anyone?


I smell a Halloween costuuuume. I guess I'll be the ox sidekick because I'm such a babe

overlock & overload

$
0
0

I had an epic jersey stash-busting sewing marathon this past week. I recently organized my sewing room (see proof here) and sorted my fabric by type/content as well as fabric-I-want-to-use and wtf-was-I-thinking-fabric. I actually don't have a large fabric stash right now (a subjective statement), but I thought it was about time I make some room for new stuff. I hate storing slinky fabric that doesn't fold crisply or stack well, so I grabbed all the drapey rayon/lycra blend jerseys that have been slipping off my narrow closet shelves for several months now. 


To help tackle all these knits, I downloaded the PDF of Grainline Studio's free Hemlock Tee pattern. It's a slouchy-fit, drop-shoulder top, which isn't necessarily the most flattering look for me, but hey, a girl's gotta lounge. I've been wearing jeans more often lately because all my tights are ripped so I can't wear dresses. Instead of buying more tights, I'm sewing more tees so I can wear jeans more often. Hopefully someone out there gets my logic.


So all week I've been busting out Hemlock tees like it's my JOB. omg I wish that were actually my job. Please, someone. This pattern is drafted in one size and only includes three pattern pieces (front, back, and sleeve -- you draft the neckband yourself). The instructions (provided in Grainline's post here) show you how to make the tee with a serger (overlocker). I almost always use my regular machine as well as my serger for construction on knits. I just feel like I have more control and dexterity with my machine, which helps when matching stripes, matching underarm seams, or attaching neckbands that need to be pretty precise.


I made some modifications on all of these. On my first practice try, the neckline was too high for my liking and the sleeves too loose. Each of my subsequent necklines were lowered about 3 inches (!!scandal!!). I also lengthened each hem about 2 to 3 inches. The hem of the tribal/cross print one is curved up at the sides, and the hem of the striped one is curved up at the front and longer at the back. I used my coverstitch machine to hem everything. Ole Janome got quite a workout this week.

I made slimmer elbow-length sleeves on the tribal print version, and slimmed down all the others so they could be scrunched up. And obviously I left off the sleeves on the zig zag print version to make a little kimono cap sleeve thing, extending the shoulder seams another inch. Oh go on, call me a ~designer~.


All three of the rayon jerseys (prints, stripes) are from Fabric.com bought within the last year. I originally intended the graphic print ones to be dresses, but they're certainly too lightweight and sheer for that. The tribal print one was advertised as blue and red, but it's definitely purple and pink. And totally printed off grain, as is typical of Fabric.com. Ah well. I made sure the pattern placement was alright so that I didn't have big crosses or pink diamonds directly on my b00bz. The gray striped fabric was going to be another Henley for Corey but he didn't like the fabric (what? Unbelievably picky, that guy). So now it's mine!


I was inspired by Makes The Things' sweater version of the Hemlock tee pattern, so I decided to make a heavier version with this turquoise sweater knit fabric that sweet Handmade Jane mailed to me all the way from the UK last year just because she knew I liked it. Seriously. She's a sewing angel among mere sewing mortals. See the raglan sleeve dress she made with this same fabric here. Thanks again, Jane! This one's definitely the warmest version, and goes to show that you can make this pattern with thicker knits, as long as they still have a bit of drape or airiness so the drop shoulder doesn't look too bubbly and weird.


The Hemlock has you choose your desired neckband width. I used a 2" wide quilt building ruler to cut all my neckbands out. All of them are folded in half wrong sides together then sewn/serged to the neckline with a 5/8" seam allowance and pressed up, except the short sleeve zig zag one, which was sewn at 3/8". Two of them I topstitched down and two I did not. I ALWAYS attach my knit neckbands flat instead of in-the-round, then connect the second shoulder seam after the fact. That way I can achieve my desired neckband snugness without doing any math or fiddly trial and error work.

The Hemlock pattern obviously sews up very quickly, so I recommend it if you want to whip up some basics, need to get out of a sewing rut, sew up some of your jersey stash, or, as in my case, all of the above. I've already worn mine to work, to the movies, to the gym, and/or to bed. Multi-purpose, gotta love it. Thanks for another great little pattern, Jen B. You're a superhero.


Who else is Hemlock crazed?


how do you store knitting needles?

$
0
0

I'm a relatively new knitter, but just as it was with sewing, the obsession hits hard and supplies accumulate extremely fast. I'm having flashbacks to when my fabric and sewing supplies all fit on half of a shelf in my living room. I had one Simplicity dress pattern and thought, "Hey, this is pretty fun..." and eight months later I had two (now three) machines and a mountain of fabric and was at the point of demanding my own sewing room.

Luckily, knitting takes up much less space, but there are a lot of small barely-distinguishable items -- often in pairs or quadruples -- that can be tricky to keep track of. I started out buying only the knitting needles I needed for the projects I wanted to do, but that quickly became frustrating when I downloaded a new pattern and wanted to start right away but didn't have the proper needles. It's also pretty clear that buying needles in bulk or in interchangeable sets can save you a LOT of money in the end. I did buy the Knit Picks interchangeable set for circulars and straights, but its vinyl case has already ripped.


So, you know the story. I already have a lot of needles and no idea how to organize them neatly so everything is easy to find. I know many of you are knitters, so I'm turning to my favorite people in the blogosphere: I need your advice on knitting supply storage.

How do you store all your knitting needles? Do you organize everything by size, type, length, etc? Do you keep them all in the same case, or in multiple places? Do you keep them in the original packaging? Do you label everything? How do you keep all your sets of double-pointed needles together? Do you make sure your storage is portable? Do you prefer to roll everything up, fold everything up, hang everything up, or throw it all in a bag or box and toss it in the closet? Do you hack other storage devices (i.e. CD cases, three-ring binders, Ziploc bags, vases, etc)? Did you SEW your own case (and what pattern did you use)? Where do you keep your stitch markers, point protectors, gauge rulers and all the other small doodads that so easily disappear in the dark depths of the couch cushions? Etc. etc.

Two recent projects - the Lucky 7 Hat and the Vermont Hat

Tell me everything! I'd love to hear about your knitting organization systems (or lack thereof, to know I'm not alone) so I can figure out the best way to proceed before things get out of control. Thanks in advance!

my 4 favorite shirtmaking tools

$
0
0

I'm thrilled that so many of you have found my tutorial on sewing a shirt collar to be helpful. Thrilled enough to keep talking about sewing shirts. O'boy! I'm continuing to feverishly sew button-downs for my main dude, so I'm slowly learning (er, improvising) all the little tricks to getting better results each time. It's satisfying to watch my skills improve and to figure out my go-to methods that lead to consistent outcomes. Translation: I'm addicted. I also may have accidentally drafted a multi-size men's shirt pattern. Moving on!

Since I'm just a home sewer with run-of-the-mill equipment you can find relatively easily, I thought I'd share with you the extra "tools" I use regularly when sewing shirts to help get the details right. Some of them are hardly tools -- just stuff. This list includes items that I use in addition to normal sewing equipment/notions such as a machine, ruler, seam ripper, etc. So none of these are absolutely essential for sewing a nice-looking shirt. They just make it all a bit easier.

TOOL #1.GLUE STICK


I've always used a glue stick to help attach centered zippers on skirts, ever since I saw this tutorial on Sew Mama Sew a million years ago. Now I use one throughout the shirtmaking process, too, particularly when I need to secure something on the inside while sewing from the right side. To me, glue makes it easier to control the fabric and get it perfectly positioned, and can be faster than basting and more secure than pinning, especially on slippery fabrics that will immediately shift as you remove the pins during sewing. And the stakes aren't that high -- you can easily reposition something before the glue dries... or even after.

Here I use fabric glue from JoAnn's that claims it is water-soluble and won't "gunk up" your machine needle, but I've also used the regular ole office supply stuff in the past. Here's when I use a glue stick:

- To secure button plackets so they're less likely to ripple or drag when you're topstitching them down...


- To secure a pocket before sewing it on...


- To position the inner collar stand's lower seam allowance before edgestitching it in place from the right side...


- And to help make sleeve plackets by properly positioning all the folded parts (by the way, I use Pam's two-piece shirt sleeve placket tutorial which I highly recommend. She also uses glue at one point!)...


TOOL #2. EDGESTITCHING FOOT (edge stitching foot, edge-stitching foot, edge stitch foot, whatever) 


Ever since getting an edgestitching foot (also known as a stitch-in-the-ditch foot or edge-joining foot), my shirtmaking confidence has skyrocketed. It has a centered guide that enables you to sew precisely at 1/16" or 1/8" from a seam or the edge of your garment, or directly within a seam if you need to. Of course it's not impossible to sew close to the edge without one, but I can't tell you how many times I used to seam-rip and redo my edgestitching, especially on the back yoke when there's a long horizontal line where any wave in your stitches is very obvious. I just couldn't stand the thought of people sitting behind me on the subway and staring at my crookedly-stitched yoke. NIGHTMARES.


It sounds fussy but I don't mind investing money in sewing tools that produce satisfactory results almost every time without having to put in much more time or effort to learn how to use it, and this is one of those things. I bought this generic snap-on foot from Amazon that works with most low-shank machines. It was about $10. 

I use it on pockets...


The yoke...


Collar stand...


And sleeve placket...


TOOL #3. SCRAP FABRIC
You've probably heard this before, but one way to get even stitches when topstitching or edgestitching is to ensure your presser foot remains level. Have you ever tried to sew over a bulky seam or continue stitching after a pivot point, but the presser foot just won't move and your bobbin thread gets all tangled? It's likely because your poor foot is stuck trying to move uphill:


If you shove some scrap fabric under the foot behind the piece you're sewing, the presser foot will no longer be tilted up at an angle and it will sew forward much more smoothly. This was a game changer for me when top-stitching collars points and collar stands. No more tiny little struggle stitches on full display around your face!


TOOL #4. SLEEVE BOARD


This is probably one that's only worth it if you sew a lot of long-sleeved shirts (or other kinds of narrow tubes, I guess). Before now, I always just serged all my shirt seams, but now I've been forcing myself to make French seams or flat-felled seams because they're more attractive when the sleeves are rolled up, which for Corey and me is always. Pressing all the way down the sleeve seam is essential for this kind of finish, so it's just easier to have a sleeve board for this process so you can flatten out and fold the seams most efficiently. 


If you're desperate, though, you can just stick a narrow rolled up towel down your sleeves, too, though it will be a bit squishy and may not get your seams as flat.


And that's it! I tried thinking of five tools but these are really the only ones I use regularly. I own some other stuff like an expanding buttonhole placement ruler gauge thingy, but I find it sufficient to measure buttonhole placement with a normal straight ruler.

What are your favorite shirtmaking tools? Any that I haven't thought of? Chime in, buttercups.

rosemont and the wild ponies

$
0
0

Grandma bun and grandpa sweater. I am an old soul with a short skirt.

WHAT, pray tell, is better than wearing an enormous 100% wool cardigan that envelops you completely as you battle through a miserably endless winter? I can think of nothing else, especially now that I own one for the very first time. "Own" isn't even the right word, because it's not like I just plucked it from the gramps section of the thrift store and handed over $4 for it. This puppy was hand-knitted by yours truly, and it's astonishing to me that every fiber of its being has passed through my hands and grew before my eyes from a tiny little woolly sprout to this oversized blanket-with-sleeves that I never want to remove from my shoulders until Mr. Sun is back full-force on this side of the earth. There's something about knitting that feels much more involved and intimate than sewing (depending on the project, I guess), so I apologize for the sentimental maternal-like gushing that's going on here. Crafty high -- I can't think straight.


PATTERN: The pattern! It is the Rosemont Cardigan by Hannah Fettig, newly released in February 2014. It's a shawl-collar open front cardigan that's knitted seamlessly from the top-down. Being new to knitting, I still don't know where to start to look for patterns as I don't have any go-to designers yet. Ravelry is a wonderful resource but is absolutely overwhelming. Even if I filter by garment type, style, price, yarn weight, needle size, age/gender, and construction technique, there can still be hundreds of pages of patterns to sift through. And a lot of it is godawful. So, when I visited the blog of a local yarn company, Kelbourne Woolens, and saw they were hosting a knit-along for a new cardigan pattern, I jumped at the chance to have someone ELSE tell me what to knit. I liked that the Rosemont has no closures, is knitted with aran weight yarn, and is a basic, unisex style that's still pretty cute.


I'm grateful for the Ravelry group and knit-along because the pattern's wording for the raglan and neck increases was incredibly confusing to me (and others, thank goodness). If you decide to make this pattern, definitely consult this post first, which explains the logic and order of it all. I would have given up without that help, really. After that was all sorted out, I sped away from the group and finished the rest of the sweater within two weeks. The knit along is supposed to last two months! I am psychotic.


SIZE: I decided to knit the size that corresponded with a finished bust measurement of 39.5", with an added five inches of length to the body. It's the third smallest size out of 11 (eleven!) sizes, so I thought that even though 39.5 inches sounded baggy, it would be fine. The model in the pattern photos is wearing the 36.75" and she's quite slim, so I thought it'd be safe to go up just one size from her. Okay, wow, this cardigan ended up much bigger than I thought it would be, but luckily I'm a fan of oversized sweaters so I'm happy with it. I guess my row gauge ended up being way off because I even stopped knitting the sleeves a full 10 rows sooner than instructed.


YARN: The knit-a-long is using Terra yarn, which is a fancy baby alpaca/merino/silk blend that your girl here simply cannot afford, even if it would mean I could joyfully think of baby alpacas the whole time, whether or not that's what "baby alpaca" yarn actually means:


Cannot. handle. 

Anyway, for a big fat yarn-eating cardigan for an unconfident knitter, I went the economical route and chose Knit Picks' Andes del Campo in the color Smoulder Heather. I don't know what the public consensus is on the quality of Knit Picks yarn (thoughts?), but a 100% Highland wool yarn for $5.49/ball is hard to resist. I ended up using just over seven skeins so it's a relatively affordable sweater all things considered (not counting labor). It's pretty soft and not that itchy on bare skin. I think this is ACTUALLY the first authentic wool sweater I've ever owned and worn. I have a ton of store-bought cardigans that are either cotton or some acrylic cocktail mix.

The color is described as: ""Inspired by the warm glow of a bonfire, Smoulder Heather is a rusty burnt orange with mahogany undertones that is combined with heathered flecks of yellow, burgundy, and purple." It is definitely an autumn color, but it complements my coloring and it matches my boots, living room brick wall and hardwood floors so, you know, here it is in February. It looks toasty brown from afar but is actually quite complex:


CONSTRUCTION AND SHAPING: I taught myself how to do the knit stitch in continental style, which is SO much faster than English style, but I cannot for the life of me do purl stitches in continental style. I also can't knit continental on double-pointed needles, so my first sleeve felt like it took forever, especially since I always drop stitches accidentally on DPNs. I switched to the Magic Loop for the second sleeve, and since it was circular I could just knit continental nonstop without purling, so the whole sleeve took like 2/3 the amount of time.

Just after finishing the sweater, I couldn't get the shawl collar to roll properly. Wet-blocking helped me form the collar to proper shape, at least when flat, but as soon as I put it on it doesn't want to roll enough of the way back to cover more of the neck ribbing. I don't know if it's supposed to, and I can't tell if it's just because my sweater is so oversized it doesn't fit my shoulders properly. The ribbing does seem laughably deep:


THE PONIES: Okay, I can't ignore the ponies. I sewed this basic dress in January from some silky poly I found at Jomar. Of course I liked the print, even though these are insane, chaotic horses tromping about all upside down and round about. Took me awhile to figure out which was way up -- or which way had the most upright horses. The dress itself is okay. Sleeveless, elastic waist, lined skirt, self-bound neckline and armholes. It doesn't fit beautifully so it actually benefits from being overshadowed by a huge grandpa cardigan. The pattern is (roughly) the bottom layer of the BurdaStyle Double Layer Tank dress, which I've used before.


Alright my little alpaca babes, how are you staying warm? Is anyone else knitting the Rosemont or knitting/sewing something just as snuggleh?


Ravelry notes here.


spring sewing: a plan

$
0
0

How can I call myself a blogger if I have never done a wardrobe planning post with carefully curated photos of all the beautiful stylized garments I want to make and wear for the upcoming season? I've never even been to the Polyvore site, whatever that is. I must be pretty damn narcissistic if I just want to clog up my blog with photos of stuff already made by ME. 

Sewing plans and personal style analysis have been the rage among other bloggers (example), but that takes thoughtfulness and care. Lord knows my sewing to date has not involved much of either. I'm usually just like, "Oh, a new Grainline pattern release? That'll do, pig" and then I make 200 versions and consider myself a superhero.

But my style is changing and so is my lifestyle, so I'm finding myself stuck with patterns and fabric that I don't want to sew but with no real idea of what I do want to sew. I had a full day where I could work on projects for myself, but I DIDN'T KNOW WHAT TO SEW so I repaired my friend's pants and then washed a sink full of dishes instead. wtf. So, I thought if I actually did some research and set some guidelines, I would always have something in the queue and I would be less likely to feel uninspired. I should plan my fabric and notion purchases ahead of time so ripe sewing time doesn't turn into ass-numbing-TV-watching time due to lack of ideas or resources.

Anyway, get to the point. Here are some things I want to make for the warmer weather:

1) Cropped Bomber Jacket


Sources: 1 / 2
It's on everyone's to-sew list this year: a Rigel Bomber from Papercut Patterns. I got it for Christmas! The fever spread ever since Sophie's polka dot version debuted and the crowd went wild. I look better in jackets that have a more defined waist, and I've gotten a lot of mileage out of a secondhand cropped bomber jacket I bought a few years ago, so I think I'm gonna chop off some length from the Rigel when I make it, probably even shorter than the ones above. Deciding on fabric is the hardest part. Is a denim bomber jacket unacceptably 80s?

2) V-Neck Tops


Sources: 1 / 2
I think everything I make is either a collared shirt or a scoop-neck knit top/dress. I tend to avoid v-necks, I guess because they're harder to sew, but I need more tops and I need more variety in my life. I figure I can adapt a pattern, or find one, to make a drapey v-neck with a buttoned front like these.

3) Shirt Dresses


Sources: 1 / 2
How cute is Paunnet in her sleeveless Bleuet Dress? The contrast collar is killing me. I also stumbled across this new Salme buttonless "shirt dress" pattern. It seems very simple and fun to sew, though I'm worried about swayback adjustment issues since I don't think there's a waist seam. I wish Salme showed their patterns on real people. I think it's holding people back from trying them!

4) High-Waisted Shorts


Source: 1 / 2
Err this is a big maybe. I haven't worn any kind of shorts in public in YEARS. Too self-conscious. But now that high-waisted shorts are trendy, this helps the pear shapes among us. I would never wear them as short as pictured, and I'd have to be really careful about fit and fabric, but if I can find the right pattern it could be liberating. Speaking of Salme, their Paperbag Waist Shorts look fantastic laying flat... but again they could look disastrous on a full-hipped lady like meself.

5) Bags


Source: 1 / 2
For normal use I just want a bag that is big enough to carry money, phone and keys but still has a shoulder strap, so it's not as awkward as a large purse to tote around at house parties and bars (I live a rowdy life). I'm wondering if I can find a clutch or wallet tutorial and add my own strap. Conversely, I also want to make a bag that's large enough to pack clothes for traveling. I don't own a functional duffel bag, so packing for overnight trips has been a head-scratch. The one pictured above, which is Kelli's awesome It's a Cinch bag, probably isn't big enough for packing clothes, but her use of fabric and detailing is what I'm after. I'll probably make Grainline's Portside Travel Set because I hear Amy Butler's Weekender Bag makes for a stressful sewing odyssey.

6) Springy Sweaters


Sources: 1 / 2
I didn't mean to choose two yellow sweaters to feature but it must be my winter-induced Vitamin D deficiency speaking. I'm so happy I can incorporate sweaters into my handmade wardrobe now! I'm pretty obsessed with Knit York City's version of Amy Christoffers'Faro Pullover sweater. I stared at the instructions all day today and am still unsure I can tackle it. Pipe dreams! Its lacy details and elbow-length sleeves have me believe I can wear it in in warmer weather. Andi Satterlund's Marion cardigan also uses worsted weight yarn, but has cropped length and cropped sleeves so it seems suitable for spring. I think I need help with the order of construction for her designs, too. Ugh learning curves.

 ------------------------------------------------------------------------------------

I feel better already. Of course I will sew other things not on this list (I have unrelated pattern testing and blog tour garments coming up!) but it's helpful to have some more direction so I never decide to WASH DISHES instead of sew (or knit) ever again.

Are any of you planning on tackling the same types of garments or patterns? Do you have any pattern recommendations for my list? 

rosa flora

$
0
0
What's the worst thing that can happen if you try to sew at the same time as you're cooking dinner? Alright, maybe not worst, because that would be like catching your WIP on fire or dropping pins in your soup without realizing it until it's too late.


Here's the answer I'm looking for because it's what happened to me: Forget to wash your hands after a particularly involved cook-prep task and then notice that olive oil has rubbed all over various areas of the solid plum SILK POPLIN dress you just hemmed and it won't come out despite all your eHow stain removal research and you're supposed to photograph your dress for your blog ASAP because it's the Flora Dress you pattern-tested for By Hand London and they already announced the pattern and all the other beautiful pattern testers have dutifully blogged about theirs but you're just a dirty oil-handed slacker who practically ruined your dress during its final stage of hemming.


While Ms. Silk Flora gets sent to the dry cleaner in a future life, I decided to make another one to show y'all. This is Ms. Cotton Flora. She took me a third the amount of time due to muscle memory, yet I like her three times as much and not just because she's machine washable and properly obeys the steam of an iron like a garment should. She's just CUTE. This print is not something I would normally use whatsoever, but this one grabbed me for some reason. It's a quilting cotton (no judgey, please) by Juliana Horner found at JoAnn's (here for now). Roses! I've never owned a rose-print garment, much less a real bouquet of roses, in my life. What did my boyfriend buy me for Valentine's Day? An extra-large order of fries from Checker's and a six-pack of beer, thank you very much. The only joke there is when I said my boyfriend actually "bought me something." ...We split the cost.


THE PATTERN: The Flora Dress is the newest pattern release from By Hand London (BHL), the beloved UK-based indie pattern company best known (by abundance of blogged makes, anyway) for their Elisalex Dress and Anna Dress. The Flora has a pleated circular skirt and the option for a faux wrap bodice or a fitted tank bodice with thick straps. The skirt can be made with a dipped or straight hem. In my true test version for this pattern, before the oil spill version, I made the wrap bodice. It has a plungy depth, as most wrap dresses do, so not something I felt comfortable wearing. For my silk... and cotton... versions, I made the tank bodice instead. It kinda reminds me of an apron but is that a bad thing? Nah.


CONSTRUCTION: I hadn't sewn a BHL pattern before now, and I found it fun to do so. They make some sassy patterns with simple construction, which is certainly part of why the blogosphere loves 'em. This pattern is basic dressmaking so if you are willing to sew a lot of darts (12 of them counting the lining...), some pleats and an invisible zipper, it's a pretty breezy sew. I used a draft version of the instructions so can't speak to the final edit, but I bet if you have a dress or two in your sewing resume, you'll have no problemo with the Flora. And of course (as seemingly expected of patternmakers nowadays!), there will be a Flora sew-along on the BHL blog.


FIT: The Flora is drafted to be pretty darn fitted in the torso, so beware if you're used to commercial pattern sizing. Par exemple, if you have a 35" bust and a 28" waist, it says to sew a US size 8 (UK size 12), which has finished garment measurements of 35.5" bust and 28.5" waist, so only 1/2" of ease (breathing room). Most Simplicity or McCall's patterns will have like 4 inches of ease, ha. I have a 34" bust and a 27" waist but instead of the US size 6 as recommended, I sewed the US size 8 and found it still fits snugly, which I happen to prefer but maybe you want even more room. I like that they include the finished garment measurements so you can make your own call on sizing.

The trickier parts to fit on this pattern for me were the front darts. I had to move the bust darts down 1/2" and the waist darts inward 3/4", with those dart points also moved down 1/2". I also removed a smidge of width from the vertical waist darts. I think this bodice is drafted for a full B cup and I'm not there, though I'm still waiting with bated breath for that day. Note that if you move your vertical waist darts in any direction, the front pleats on your skirt will also have to be moved so they still align. I also shaved 1/4" off each side of the center back seam at the upper back to prevent some gaping at the neckline.


CHANGES: I lowered the front neckline by 2" total. I lost the strap pattern piece (?!) so I had to improvise my own and guess at the length they needed to be. I have no idea if this affected where the neckline sits in the end. It doesn't really look like a 2" drop from the other bloggers who made this variation of the pattern. I could stand to go lower still.

The test pattern didn't have a straight hem option (the published one does), but I straightened it out myself and cut the skirt out at about 21" all the way around .I hemmed with a baby hem instead of 5/8". The pictures make me realize I probably made it too short, as always, but oh well. Tights rule my life anyway.


The shell of the dress needs 60" wide fabric to accommodate the size of the circular skirt. I used 45" fabric here which meant I had to narrow the width of the skirt quite a bit, like Diary of a Chainstitcher did. Kinda regret that I lost some of the swirly volume because of this, and the back pleats don't skim over my hips as nicely as a result. If you have 45" fabric but want more oomph, you can do as Dolly Clackett did and cut the skirt on the cross grain if your fabric doesn't have a directional print or stretch. I used self fabric to line the bodice and attached the invisible zipper to the shell only so I could cleanly attach the lining to the zipper by machine.


The Flora Dress is a cutie so I recommend this pattern if you don't have a similar style already in your stash. It's nothing earth-shattering in terms of design but it's an enjoyable make. Can't wait to see what else is in store for the future of BHL.

So what's the moral of the story here? Sewing dresses is dandy, and roasting spaghetti squash leads to a delicious meal, but, uh, don't do those things at the same time.

perfect pattern parcel: dandelion dress

$
0
0

Bare skin! Watch out now y'all. The earth is finally tilting in my favor after ignoring my pleas for like two full months. Though I prefer cold weather fashion, I will always prefer warm climates even if it means I have to stow away my beloved grandpa cardigans. My heating bill was half my rent last month, so... get lo$t, winter.


Here's a cool little number. I'm participating in the blog tour to help promote the newly launched Perfect Pattern Parcel, which is a way to purchase a bundle of five PDF patterns by independent designers -- naming your own price! -- with part of the proceeds going to charity. It's headed up by Jill of Made with Moxie and Rachael of Imagine Gnats. Cool idea, right? The first parcel includes five women's patterns, most of which you probably recognize:

Lady Skater Dress by Kitschy Coo
Dandelion Top/Dress by Seamster Patterns
Summer Concert Tee by Dixie DIY
Ava Dress by Victory Patterns
Accordion Bag by Sew Sweetness

The charity supported by this parcel is Donor's Choose, a non-profit that matches the needs of teachers and their students for specific projects with willing donors. The funds raised from each Pattern Parcel sale will support these efforts to minimize educational inequality and expand the resources available for children K-12 to receive a quality education. 


THE PATTERN: After much waffling about what to sew first, I decided to use this opportunity to try out a new-to-me pattern company, Seamster Patterns (formerly known as Disparate Disciplines). I knew they existed but I hadn't researched their patterns fully. The Dandelion Dress is a semi-fitted top or shift dress with a few combinations of necklines and sleeve options. I don't normally scramble to buy shift dress patterns because they're hard to fit on my body, but the unique construction and seaming of the Dandelion caught my attention. I've never seen anything like it. Here's the side, with the front on the left:


I chose to make the scoop neck raglan sleeve dress. The pattern pieces look crazy and I often had no idea what parts of the garment I was even sewing together, but suddenly I noticed I had made a dress. Here's what one step of the construction looks like:


It was fun to make something that was actually pretty simple but used a unique construction process. Sometimes you just get bored sewing plain ole side seams, yaknowwhatImean. The Dandelion is easy enough to follow and comes together surprisingly quickly.


FIT: I did have an... interesting time with fit. As expected with a shift dress, there was a swayback issue on my muslin. Big time. There was also excess fabric in the front, which I believe is how the pattern is drafted -- they advertise it as a dress you can move and eat comfortably in. My muslin was made of stiff quilting cotton and I looked preggo in it when I slouched. To adjust, I had to fold out two vertical inches of the back pattern pieces at the lower back and somehow grade it out to nothing at the sides (where are the sides?!). I kept muttering "This is going to be a disaster" as I was altering the pattern pieces, because a 2" swayback adjustment seemed outrageous and undoable, especially on unconventional pattern pieces like these. I also folded out 1" from the waistline at the front. Miraculously, though, it worked well enough. The dress now hangs properly and doesn't have a hurricane of fabric swirling over my ass. It's still a comfy fit though, as it's intended. This is the size S, by the way.


CHANGES (besides shortening it too much, duh): I used a knit fabric because it was the only workable fabric in my stash for this pattern. Plus I wanted to use something solid so you could actually see the seaming. I seem to own a TON of chiffon (why, oh god) and a TON of wool, but not much in between. Brilliant. I like the texture of this fabric, I think. It's a stable knit that was easy to sew, but it's kinda bulky at all those darts and seam intersections. Because of the darts, you can't really make this pattern as is on a serger alone.

To accommodate the knit fabric, I eliminated the back zipper and finished the neckline with a band instead of a facing. I attached the neckband flat before sewing the center back seam together so I didn't have to calculate the circumference. I hemmed the sleeves and bottom edge on my coverstitch machine. I thought that stupid thing was broken because it was spitting out garbage stitches on lighter weight knits last week, but it sews beautifully on this kind of fabric. Make up your mind, Coverpro.


As always I have things to point out about the pattern. Why can't I just say "'Here's a dress. Alright see ya"? I guess I think I'm being helpful to others by yammering on for days. What's wonderful, in theory, about this PDF pattern is that it tells you which pages to print for which variation you're making -- so I didn't have to print out a bunch of sweetheart necklines or tank top yokes if I wasn't going to use them. However, the guideline was wrong and it didn't list enough of the pages I actually needed, which I didn't notice until I had taped everything together so had to go back to the PDF and scroll through each page to figure out what I was missing. I haven't seen other bloggers mention this so maybe my version was weird, or maybe nobody wants to point out pattern mistakes.

These front bust darts drive me crazy. I tried narrowing them, but they are still very prominent and eye-catching on a solid color fabric because the dart points end directly on the apex. I softened the dart points here a bit in my photo editing software so I wouldn't cause you to blush, but in real life they're much more "Hey girl." I also feel like these seam lines and darts together with raglan sleeves and a scoop neck is kind of a strange style combination -- like this dress can't decide if it's a t-shirt dress or something fancier. Styling is key, and I'm not stellar at that because I don't own much jewelry or shoes. The scarf helps I guess. I made it!


PERFECT PATTERN PARCEL: There is a deadline to purchase the whole 5-pattern bundle, so you have until March 21, 2014 to do so, which you can do here. They're hosting a huge giveaway of fabric shop gift certificates, too, so head to their Facebook page to get a chance. There are billionz of other bloggers participating in the blog tour posting their own creations from the available bundle of patterns. Some of my favorite garments so far are: True Bias, Adirondack Inspired, and Crafterhours.


IN CONCLUSION: Here's a dress. Alright, see ya. Oh, and buy the PPP.

out & about

$
0
0

Before I get to the meat of this post, let's have a lively discussion about photo files, shall we. For some reason every time I upload a JPG file to my blog, the image turns overly pixelated and blurry. This is a recent development because I used to use JPG files all the time. When I save the same image as a PNG file, it uploads much clearer in Blogger -- just as I see it in my photo editing software. However, PNG photos do not show up when I look at my blog posts in the Feedly app on my phone, nor do they show up when I try to pin them on Pinterest, and they're unable to be saved directly from the page. Has anyone else experienced anything similar -- where PNG files aren't "pinnable", or where JPG files are all screwed up in Blogger? I prefer my photos to look better on my actual blog so I've been using the PNGs but I hate the thought of people not being able to read my full posts on other platforms.

No one's said anything, but let me know if you've experienced any issues with my fotes not showing up somewhere. If you do want to pin my blog photos on Pinterest, like to your "Favorite People in the World" board for example, you can just hover over the image and a small red "Pin It" button will appear on the top left.


Anyway, what are you wearing, little one? A new dress! Made of jersey fabric! Get out.

Or should I say, get out & about? The base pattern I used is the recently released Out and About Dress by Sew Caroline, one of my fellow Project Sewn Season 1 contestants who just launched her own PDF pattern company and is also now a fabric designer and an e-book writer and probably a million other things I wish for my sewing self. Geez, some people and their ambitious entrepreneurship. 


And their lush green surroundings. If I took photos of myself walking around my neighborhood I would be kicking through piles of Fritos bags and Honey Bun wrappers. Philly's nasty <3

The Out and About is a basic knit dress with a scoop neck, cuffed sleeves and a gathered skirt that's either knee-length or maxi length. A modest dress for casual everyday wear. If you're new to sewing in general or new to knits, this could be a good place to start because it's a fast sew with a forgiving fit. Caroline's instructions are really thorough with color photographs of each step. She even recommends hemming the sleeves and skirt using Lite E-Z Steam, which helps stabilize the fabric so it doesn't get wavy and stretched out while topstitching the hem. Smart cookie.


I've already made Renfrew dresses and Lady Skaters (unblogged, yikes) so I didn't really want another knit dress with elbow-length set-in sleeves. So I went WILD with this one and extended the shoulder line to make little kimono sleeves instead. I actually meant to make it have more ease in the bodice so I cut the size Medium when I otherwise would have cut the Small, but it's still pretty fitted. The sleeves are hemmed with my coverstitch and not a band.


I also decided to do "color blocking" and make the bodice in leftover black jersey and the skirt in a print. Ooh she bad. For some reason I've never mixed fabrics in one pattern like this before, I guess because I normally don't have anything in my stash that coordinates. It also means I have enough leftover of the print jersey to make a t-shirt or something, which I'm happy about because this fabric is freaking heavenly to wear. It's a rayon jersey with 5% spandex so it's bouncy, drapey and opaque without being heavy. Normally I don't like gathered skirts that sit at the waist because of the bulk, but this fabric hangs nicely. It's from a special designer collection at JoAnn's (here) if you're into it. Yea, one of their so-called "ethnic" fabrics, which always makes me cringe.


My favorite method for gathering fabric for a skirt like this is to sew a zig-zag stitch over a strand of dental floss and then pull. It's faster because there's no need to sew two or three lines of basting stitches, and the dental floss is strong and the fabric glides right over it so there is no risk of threads breaking as you pull and having to start over again. Just be sure you don't accidentally stitch on top of the dental floss at any point because then the fabric won't move at that section.


I left the dental floss in while attaching the bodice to the gathered skirt by sewing directly below the strand and then simply pulling it out afterward.


My only issue, if you could even call it that, with this pattern was that the bodice was drafted to dip down at the sides instead of curve slightly upward like I'm used to seeing. I think I could notice the sides pulling downward on Caroline's black maxi dress, pictured above, so I modified it by changing the direction of the curve so it looked more even once worn. I also decided to add elastic to the waist seam so it wouldn't stretch out over time or droop. Otherwise I am pleased with the drafting of the pattern and happy to support another independent designer entering the market. Keep 'em coming.


This post is part of the Out & About Dress blog tour hosted by Sew Caroline. More of this pattern will be popping up in the coming week by the following talented seamsters:

Mon, March 24: Adventures in Dressmaking and Four Square Walls (that's me, you guys)
Tues, March 25: Alida Makes and Paisley Roots
Weds, March 26: Lexi Made and True Bias
Thurs, March 27: Sewing Like Mad and A Golden Afternoon
Fri, March 28: Lladybird and House of Pinheiro

Now that there are some great options for knit dresses by independent companies out there (Lady Skater, Coco, City Girl Frock, LolaOut & About, any others?), what's your favorite one or which ones would you like to try?


portside duffel bag

$
0
0

Duffle bag or duffel bag? I think they're interchangeable but I've always used the -el version. Neither spelling is recognized by this spell check anyway. No, Blogger, I don't mean "ruffle" and I certainly don't mean "luffed." WHAT IS LUFFED?


It's probably not normal for a person to love a duffel bag as much as I love this one. I don't love much of what I make, I admit. Sure, there are handmade garments that I like because they're comfortable or flattering. But LOVE? I usually reserve that for family, my boyfriend, dogs, and French fries only. And now this bag. I kept complimenting its beauty (aloud, yes) while photographing it. Truly creepy.


The pattern is the duffel bag from Grainline Studio's Portside Travel Set, released in October 2013. It's a roomy bag (20" x 11.5" x 12") designed with a zip top, handles and a detachable shoulder strap made from webbing, two exterior pockets, and a full lining (hooray!). It's been on the back of my mind for awhile, but the only trips I've taken since its release have either required a monster suitcase or a tiny overnight bag -- which is the only luggage I've owned since moving to Phila. I'm taking a last-minute trip to Louisville this weekend and staying three nights, and I started wondering what I was going to use to pack for that length of trip. Ohhh right, Jen B's got my back as always. The whole set includes the duffel, a dopp kit for toiletries, and a zipped pouch for other small travel necessities. I didn't make the little guys but you bet I'm saving the pattern pieces.


The fabrics and notions I used are all from my stash because I was in a hurry to make this and I'm broke as a joke. I ain't mad about a little neutral-mixing, though. The contrast is made from wool coating that I never got around to using for a garment this past winter despite my obsession with it. It's a navy/black mix with gray plaid. I cut the side panels on the bias so I wouldn't have to match the plaids horizontally over the curve, ha. The bias-cut pieces are also interfaced to prevent stretching and drooping.

The self/bottom fabric is... can I say "vegan leather" so it sounds classier? It's cloth-backed home decor vinyl that I got for 99 cents at Jomar in Philly. It was easier to work with than I expected despite its bulk. Some basic tips for sewing with vinyl can be found here, which covers what I did, though I admit I used a low-heat iron on the cloth side of the vinyl to try (and mostly fail) to remove its wrinkles. Nothing melted. The only problem I had with the vinyl was uneven stitch length on the topstitching because it would randomly start to drag. The bag is large, too, so it would often get crammed against the wall behind my machine and the fabric would stall. Can't fix topstitching in vinyl, though, so I'm living with it!


I lined it in bright red fabric -- cut from an old Target curtain that didn't fit our windows. I could have used some beige linen in my stash but I wanted to make the piece somewhat more exciting since it's handmade and all. And you know I can't resist pairing red with black. Since I was using this pleather stuff, I also had to line the outside pockets because the back of it is so unsightly.


As far as construction goes, this bag is a pretty straightforward sew. I finished it from first cut to final slip stitch in less than 5 hours, which included the extra step of making my own double-topstitched straps instead of using webbing. I didn't have the hardware or patience to make a shoulder strap, but I made the handles long enough to be shoulder-slingable as is. Because you can't pin vinyl (it leaves permanent holes), I used Wonder Tape to secure the straps to the bag before sewing them on. It's basically just narrow double-sided tape that dissolves in water. Good for positioning zippers and pockets and such, too.


To give a better sense of its size, here is Corey wearing it. Don't be fooled -- this bag is for me, not him, though the fabric choices are decidedly unisex. He thought this bag was store-bought until I started getting it plumped up for its glamourous photoshoot. Natch he's requested his own now.


The Portside Duffel is larger than most other travel bag patterns I've come across, which was perfect for what I needed. In the first set of Corey-less photos of this post, the bag is stuffed with two throw pillows and about five or six pieces of multi-yard fabric. It's droopy without anything in it but I made sure the seams were sturdy enough to hold weight once full. I haven't packed my belongings for realzies in it yet, but I expect it will hold everything I need for a four day trip, especially now that it's warmer and I don't need to bring thick sweaters and boots.


The denim shirt he's wearing was also made by me a few months ago. For awhile this shirt stood as the best-loved handmade item in this household because honestly it's some of the best detail-sewing I've ever done, but now it's overshadowed (literally, here) by my AWESOME DUFFEL BAG. I love it. I luff it. Most-luffed duff in the world. This post has officially come full-circle. /gush

Who else is sewing to travel? ...Would you ever trust your handmade luggage in the hands of the airlines? Carry-on only!

P.S. With your help I fixed my pixelated image issue I  mentioned in my last post, at least on my end. Turns out it was a Google+ auto-enhance setting I needed to switch off. However, it seems the photos still don't show up on the Feedly app my iPhone so probably not Bloglovin' either. Really sorry -- I'll keep digging.

spring robin

$
0
0

This is one of those garments that you love to wear despite knowing it is not necessarily that flattering nor well-made. Ha, I act like that's a common thing for other people, too. I dunno, dude, I'm just on a baggy top kick and I don't know what else I want to wear these days. There's something pleasant and comforting about dressing like a frump. Let's call it effortfully effortless, because a lot of effort goes into knitting a baggy sweater you can take a nap in.


This little mama is knitted from the Robin pattern by Josée Paquin. It's a striped raglan-sleeve sweater with a dipped hem, knitted in one piece from the top down. It's purposely slouchy, with VERY LOW armholes for a batwing look. Wait a sec... batwings. I think I understand why she called this the Robin pattern.


Another example of someone wearing something all the time despite it being unflattering.


I wanted a sweater that I can wear in the transition months between cold and hot weather and vice versa, so I chose to make this pattern using a cotton/modal blend yarn: Shine Sport from Knit Picks. I have leggings that are cotton/modal and are heavenly to wear, and this yarn is just as delightful. I spent a lot of time just squishing it against my face. I went with the cream and black colorways to keep it classic. I used about 9.5 balls of the cream and 2 balls of black. I eventually realized I couldn't make it all the way through this sweater with so little black, so I shortened the arms to 3/4 length which is fine by me anyway.


I bought size 3 circular needles specifically to do this project, but my gauge was too loose. Instead of buying MORE needles, I just knitted the smallest size in the pattern and hoped for the best. It ended up being the size I was expecting, sooo I dodged that bullet. The insane thing about knitting garments is that you have no idea if it's going to fit until you've already invested many hours over many days, weeks, or months. At least with top-down garments you can try on as you go, but it's not like I would know how to make mid-knit fitting adjustment calculations anyway. 


It's a cropped-head kinda day, folks.

Short rows are used to shape the neckline as well as the high-low hem. The pattern has you do yarn-over short rows, which I found I prefer over wrap-and-turn short rows because it's easier to find them when you pass over them again. I don't know if these things have technical names! For help with the YO short rows, I used this resource.


I don't know what happened with my tension while knitting... or maybe it happened while weaving in all the ends (which I always half-ass) or blocking (I dried it in the dryer!)... but my stripes are a bit wonky. You can tell in some of the photos where they look jagged. Some of the white stitches above and below the stripes were looser than others, causing the black to dip or raise in random places. In one or two places, a black stitch just disappeared. Ran for its wee little life.


I'm still a rookie, okay?! I'm not that upset. I should just probably stop switching between English and continental style knitting so often, but I get hand cramps if I don't keep it varied. 

All in all, this was a fun and relatively simple knit. I love the colors I used and find it cozy as hell to wear. As a seamstress, I appreciate that the stripes automatically match across the body to the sleeves. It's the little things.


I doubt I'd make it again (do people knit sweater patterns more than once?), but if I did I would raise the armholes by a lot and streamline the fit if possible. 

Ravelry notes here.

I guess I've accomplished two of my six handmade "goals" this spring: I made a bag and now a spring-appropriate sweater. I still plan to tackle the others, except maybe the shorts, but I keep being lured in other directions. I'm less confident about Me-Made-May this year. I've been wearing fewer me-mades recently because I no longer work in an office (uh, hallelujah), so all the business-casual dresses and skirts I've made over the past 2+ years are starting to collect dust. More baggy tops to make, I guess. Who's with me there?

narrow hem: three ways

$
0
0

I sew a lot of narrow hems these days, and I've tried so many different methods to make them. The majority of tutorials for narrow or rolled hems (that I've seen) include a ton of measuring, trimming, or exhaustive pressing. Boo, ain't got time for that. What if you could make the narrowest of hems doing a minimal amount of all that stuff, and without a rolled hem foot? Yea, I said it.

A narrow hem has a finished depth of 1/8" to 1/4". The tiniest versions, baby hems (1/8"), are typically used to keep lightweight garments flowy without weighing down the edges, and to keep the hem of sheer fabrics as inconspicuous as possible. Due to the nature of their narrowness and the nature of the fabrics you will likely be sewing them on, these hems can be tricky to fold and sew evenly if you're doing a standard hem technique of measure-fold-press-measure-fold-press-sew. So here are some alternatives.

METHOD ONE: WITH A SERGER
For a 1/4" hem, my favorite method uses a serger for the first step. You can definitely do a similar method with a regular sewing machine, but I prefer the serger because it makes folding the hem easier; the width and sturdiness of the serged stitches help keep the fold perfectly even. You can also adjust the differential feed in case you want to tighten up the edge of your fabric ever so slightly to help with easing in a curved hem.

1. Set your stitch width so the left needle hits 1/4" away from the raw edges, or just within 1/4". Thread color doesn't necessarily matter as long as your fabric's not too sheer. Serge along the raw edge of the right side of your garment without cutting anything off. IF you're using a regular sewing machine, sew a line of stitches 1/4" from the raw edge, or just within 1/4" if possible.


2. Start folding the serged stitches toward the wrong side of the garment the same width as the stitches. Or if you didn't serge the edge, fold the edge under so your first sewn line of stitches juuuust rolls to the wrong side. The width of the stitches does all the measuring for you here. I only do a quick finger press to get the fold going, then immediately start sewing from the wrong side of the garment, using my hands to keep folding the edge before it reaches the presser foot.

Sew right along the folded edge, about 1/16" inward. This secures the first fold and makes a guide for stitching on the next fold:


My thread is darker blue so you can see it. Again, this is the wrong side of the garment now:


3. Fold the edge under once more, the same depth as the first fold. Working from the wrong side of the garment, sew along the line of stitching you created in the last step, folding the hem over as you go. This secures the hem perfectly by catching the top edge in your stitching:


You will have a single line of stitching on the right side, and a doubled line of stitching on the wrong side:


A classy hem, without any tedious pressing OR measuring.

METHOD TWO: WITH BAN-ROL
This little trick needs to be wider known. If you dig on the Internet you can find it in other tutorials, but I thought I'd go ahead and share it here to help spread the word. For an even tinier hem (~1/8"), I like to use the aid of Ban-Rol, also sometimes referred to as Ban Roll. wtf is that? It's a very sturdy starched interfacing used by tailors for stiffening waistbands in pant and skirts. It comes in various widths on continuous yardage. It's loosely woven, despite being stiff, so you can peel away the threads to create a "comb" that helps easily turn your fabric for hemming but will be pulled out after stitching.


The great thing about this method is that the Ban-Rol is reusable so you can make one small investment to have a lifetime of beautiful tiny hems. You can find it in 50-yard packs on Amazon and Wawak, but there's no way you would ever need that much. They sell it by the single yard online at the Sewing Place, Crafter's Vision, Londa's Creative Threads, and B. Black and Sons (edit: and Kenton Trimmings Online, for those in the UK). I'd recommend getting a few yards so you can create different "combs" for different hem widths, or just in case you ever have to hem a maxi-length circle skirt or something cray.

1. Snip into one bound edge in order to get the first vertical thread free. From there, you can start pulling out the threads with your fingers. Keep pulling the single thread until you have a length that matches or slightly exceeds the circumference of your hem:


Keep going until you create a "comb" that is the width of the hem you would like to have. So, this would work for super teeny hems and heftier hems:


2. Now align the edge of the comb with the RIGHT SIDE of the raw edge of your garment to be hemmed. If your fabric frays madly, move the ban-rol inward slightly to stay clear of the fray. Pin if you want, but I've found that the ban-rol doesn't really shift as long as you align it correctly as you sew.


3. Take it to the sewing machine, where you will stitch JUST INSIDE the inner edge of the comb part. You don't want your stitches to catch the still-woven part of the ban-rol. Remember the comb is pulled out of your stitches later, so you should only sew over the horizontal threads:


4. For fraying fabrics, trim the stray threads off now so they don't poke out of your hem later. Now gently flip the ban-rol all the way over to the wrong side of the fabric. This rolls the tiny hem for you without you having to measure all the way around or burn your fingers with the iron. For complete accuracy, you may want to press this part down so the hem is flattened first.


5. Stitch along the edge next to the ban-rol to secure the hem.


6. Now gently pull the ban-rol comb out of the stitches.


~OmG~ what a stable, perfectly minuscule hem you just made. And there's no double stitching to be seen:


Note that you can use ban-rol when hemming in the round. Just overlap it where the circular hem meets. The comb will pull out as usual.

METHOD THREE: WITH WASH-AWAY STABILIZER
I do love the ban-rol method because it creates a very clean and light hem, versus the serged method which may add thread bulk or opacity to your hem. However, ban-rol is not flexible enough to be sewn around tight curves. I have used it on fuller A-line dress hems so it can follow gentle curves, but what if you're trying to hem a rounded placemat or the curved sides of a man's dress shirt? Or something else weird-shaped in a bee print?:


I agree; those bees are CUTE AS HELL.

This method is similar in theory to the ban-rol method, in that you're sewing something to the right side of the garment and then flipping it over to help turn the hem. EXCEPT you're using something that is wide enough so you can trim it to match the curves exactly. And you can't make a comb out of it to remove later. It's essentially like sewing a facing on a garment edge, but you want the seam to roll farther back toward the wrong side of the garment, and you want the facing to disappear somehow.

So, you have some options: you can use tracing paper, which you can then tear off the hem, but you'll leave paper in your hem. You can use tear-away stabilizer, which also leaves stabilizer in your hem. Or you can use wash-away stabilizer, which will disappear after the garment's first washing. None of these are ideal, so it just depends on what type of fabric you're working with and what you have on hand.

I decided to try this sew-and-turn method with Fabri-Solvy, which is a fabric-like wash-away stabilizer normally used for appliqués and such. It comes in a range of widths and lengths, so I thought that getting a sheet that's 20-inches wide and 1-yard long would enable me to customize my own strips to match the curves of a small hem.


1. Pin the stabilizer on top of the right side of your hem. Trim it to match the raw edge perfectly:


2. You can now trim down the rest of the stabilizer to make it easier to handle if desired. Accuracy isn't important here:


3. Sew the stabilizer to the fabric at your desired hem width:


4. Now flip the stabilizer to the wrong side of the garment. This gets a little fiddly because the stabilizer is soft, but you want to make sure the raw edge of your fabric and the stabilizer are butted up against the fold of your hem so it's an even width around. Use your fingers to maneuver the curves into place. You can use the very tip of your iron to help crease the hem, but try not to let the iron touch the exposed stabilizer because it may shrivel and/or start to melt.


5. Sew the hem in place.


6. Trim away the excess stabilizer. You can leave it as is until its first full washing, or you can saturate the hem in water for a few minutes to dissolve the stabilizer still inside the hem, then let dry.


This method is pretty effective, but it can't really be used on fabrics that shouldn't be washed. I also felt like I was using my scissors a lot, which would be annoying on a longer hem. It uses more resources in general since the stabilizer is not reusable,and I would have to buy longer sheets for bigger garments. Still a good trick to know, yes?

-------------------------------------------------------------------------------------------------

I hope this post introduced you to some new ways to achieve a nice narrow hem. Do you have any other tricks or tips to add? Are there other kinds of materials that could be used instead of ban-rol or stabilizer to help roll hems? Let me know your favorite methods!


stretch

$
0
0

My doctor told me that with all the hunching forward I do (at the computer, sewing machine, cutting table, ironing board, etc.), I need to stretch my upper body more, like with some regular yoga (or "sewga," as my colleague calls it). Don't want those pectoral muscles to shrink. Eternal slouch!

Have I taken her advice? Uh barely. But I have sewn some stretch garments...? Surely that counts toward something, like my emotional health and blogger points. And I could probably do yoga in this outfit as long as I was home alone with the curtains drawn, so we're getting there.


I was a chuffed little pattern tester for Closet Case Files' newest pattern, the Nettie Bodysuit, named after a real Nettie you may know. I remember bodysuits from the 90s as a child, but the appeal of them now is that they stay smooth and tucked in under all the high-waisted skirts I own without all that unsightly scrunched up bulk underneath. I remember Heather's debut bodysuit that she wore paired with her Tania culottes last year, and I thought she was a genius. Now she brings her genius to the masses.

The pattern comes with two neckline variations (high neck and scoop), three back neckline variations (high neck, medium scoop, and looooow scoop if you dare), and three sleeve lengths (short, 3/4 and long). Options also include a snap crotch for practicality's sake (interpret as you may), a shelf bra, and a dress length hem for some bodycon sauciness. Here I've made the bodysuit with scoop front neck, medium scoop back, and 3/4 sleeves. What else would you expect of me, really? I did make the snap crotch and I laugh every time I have to re-snap because I'm certainly not graceful at it. Maybe I attached them in the wrong direction.


Here's Ms. Thang bravely modeling the suit on its own. She's not self-conscious of her dented hips and Barbie-like thigh gap:


As you can see (..kinda), the suit is designed for full rear coverage. The leg openings, like the neckline, are bound with self-binding that is pulled quite snugly for a close fit. The whole point of a bodysuit is that it's a close fit. The Nettie has mega negative ease and calls for a fabric with 4-way stretch and 5-10% lycra content. Fabric makes all the difference in the fit of this pattern, so check out Heather's extensive post about Nettie fabrics, as I can't give much more advice than she does.

For this version I used a charcoal heather gray cotton-spandex knit from Girl Charlee (found here), which has 75% stretch. I made a generous size 8 (probably more like a 10) in the torso and arms and graded out to a size 12 at the hips. If you're unsure which size to cut, I'd recommend starting a size or two larger than your measurements indicate and go from there. With 3/8" seam allowances, there's not much you can do to size up once it's cut, but you can always take it in.


I'm so glad I made this skirt, too. The pattern is a lengthened version of a rub-off I did of an old store-bought skirt. I've decided I really need to start wearing longer (knee-length) skirts, especially in bare-legged weather, but I don't have that many casual ones. I also wanted to copy the RTW way of constructing a waistband like this: it's wide so provides stability and comfort, but there's a hidden interior channel for 3/4" elastic at the top, so the waistband won't flip over or start to droop like my other handmade knit skirts that are only held up with fabric.

I bought this fabric at the same time as the fabric for the Nettie with the intention of wearing them together. Though the fabric colors are both called "charcoal," the grays are pretty different -- the skirt is more blue -- but whatever. There's always an ~element of surprise~ in online fabric shopping. The skirt fabric is a cotton jersey in a "plant silhouette" print, also from Girl Charlee (found here). It's pretty cool but pretty similar to the print of my first Cambie dress, which I didn't realize until I started sewing it. Oh well -- Cambie doesn't get out much these days, but this skirt does. It's very breezy and soft, and the length means it normally stays decent in gusts of wind.


It's sheer so I lined it in some white fabric I originally bought to line a swimsuit. It's one of those performance knits from JoAnn. I have two swimsuit fabrics in my stash and wavering intention of actually ever making one, so I snatched the lining from the pile when I was in one of those anti-swimsuit moods after eating too many Reese's cups shaped like Easter eggs. DON'T say you can blame me. The lining is attached to the waistband as one with the skirt shell, but hangs free.


I'm planning on recreating this exact outfit in many different fabrics. A striped Nettie is definitely next in the queue. Um, I wonder if Girl Charlee offers in-house credit cards.

If you're still not convinced, check out Carolyn's seven Netties, Lauren's non-bodysuit Nettie, Lindsay's Nettie dress, Mokosha's low-back Nettie, and Nettie's own Netties. Then get yourNettie here. Phew, links.

So, do you find time to stretch out your aching sewing muscles with some sewga, or is your doc worried about the inevitable seamstress hunch, too?

in the round vs. in the flat

$
0
0
Are you a round or flat person? Um, lemme rephrase that. When given the choice, do you like to construct your garments using an in-the-round method or in-the-flat method? 

Nettie bodysuit sleeve attached flat

I don't know what else to call these techniques, really, so if you have no idea what I'm yapping about, here's the basic idea. On a bodice or top, most patterns have you sew the shoulder seams, side seams, and underarm sleeve seams pretty early on in the construction process. This creates round openings for the armholes, neck finishings, bottom opening (t-shirt hem/bodice opening to attach to skirt/etc), and sleeve caps. Here's the Scout Tee pattern as an example:


An alternative method is to leave those seams open so you can construct everything flat instead of in the round. For example, sew only one shoulder seam, attach the neck binding, then sew the other shoulder seam. You can also attach your sleeves and finish your hems BEFORE sewing the side seams and underarm seams. Here's an example from the Plantain Tee pattern for attaching sleeves flat:


I'm pretty fascinated with industrial techniques for making garments. When I "shop," I just turn clothes inside out to inspect the finishing techniques and make Hmmm noises. Of course, the fashion industry's primary goal is making clothing as quickly and cost-efficiently as possible, which means that the way they do things isn't necessarily the best way a home sewer should do them, or the way we even can with our measly little junk machines ;) However, I do strive to find ways to make sewing easier for me, and I will always try alternative methods if I think they will be faster but still achieve the same, or very similar, results. 

Storebought tank with straps attached flat before side seams are sewn

Sewing garments flat is one of those industrial methods that I will almost always turn to if possible. Awhile ago, Colette Patterns' blog featured a guest post from Sharon Blair explaining different industry practices. One of them was as follows: 
"Perform similar operations at the same time and sew flat. Sew the details first. Set these aside. Then start assembling the garment. Complete as much as you can before joining side seams. Sewing in a tube is more time consuming than sewing flat."

It's true that if you inspect your store-bought garments, you can tell that the side seams are usually sewn last in one continuous line of stitching from the sleeve opening to the hem. Many of my t-shirts have one shoulder seam sewn after the neckband is attached, and even sleeves that were hemmed before the underarm seam was sewn. To keep the serged seam more obscure, it's always pressed and tacked down toward the back of the garment. Would you ever know the differences here if you weren't looking for them?

Storebought t-shirt with sleeves hemmed before side seams sewn

I often change construction so I can use these methods, too. I never ever set in sleeves, no matter the fabric type or sleeve cap size-- I attach them flat because it's easier to ease the sleeve cap evenly this way. I'll do the same for armhole bindings because it's easier to sew on binding around curves when those curves are not yet attached in a circle. On t-shirt nec kbands, I will leave one shoulder open so I don't have to do any measuring; I'll just cut a long binding piece and "feel the stretch" as I pin it on, then snip off the excess once I reach the other shoulder. For super small hem openings, like the legs of baby leggings, hemming the legs flat is faster than forcing your presser foot around a tiny tube, especially on a coverstitch machine like mine that likes to stall and skip stitches when sewing over seams.


I figured everyone else would be lazy like me and prefer the flat construction method. However, when I was pattern-testing the Nettie Bodysuit, I applauded Heather for including instructions for constructing the neckband flat (shown above). She followed up with me to say that other testers didn't like that method, so she changed it back to "in the round" instructions for the published version. Y'all are just some tidy little seamsters, aren'tcha. 

So that made me wonder why someone would choose the round over the flat method. Does the end result look cleaner? Do you find that the methods are actually comparable in how easy or fast they seem? Do you use one on certain fabric types only? Or you just prefer to follow the pattern instructions regardless? What's your choice?

Viewing all 105 articles
Browse latest View live


Latest Images